
I’m redoing the bedroom that my kids share as part of the Spring 2016 One Room Challenge. Last week I shared my mood board for the kids’ room and a couple of ‘before’ photos. This week, I’m talking about how the DIY wall decals went up, because they have made a big impact on the space.

The Design Plan

How to Hang DIY Wall Decals
I actually put the wall decals and the shelves up a couple of months ago, which I shared when I made this DIY poster frame (which will definitely get rehung – it’s too low but the nail was already in the annoyingly dense brick wall).

The decals were an Etsy find. I thought about covering all the walls uniformly, which is what I did in Sebastian’s never-finished bedroom in our last house (check it out here).
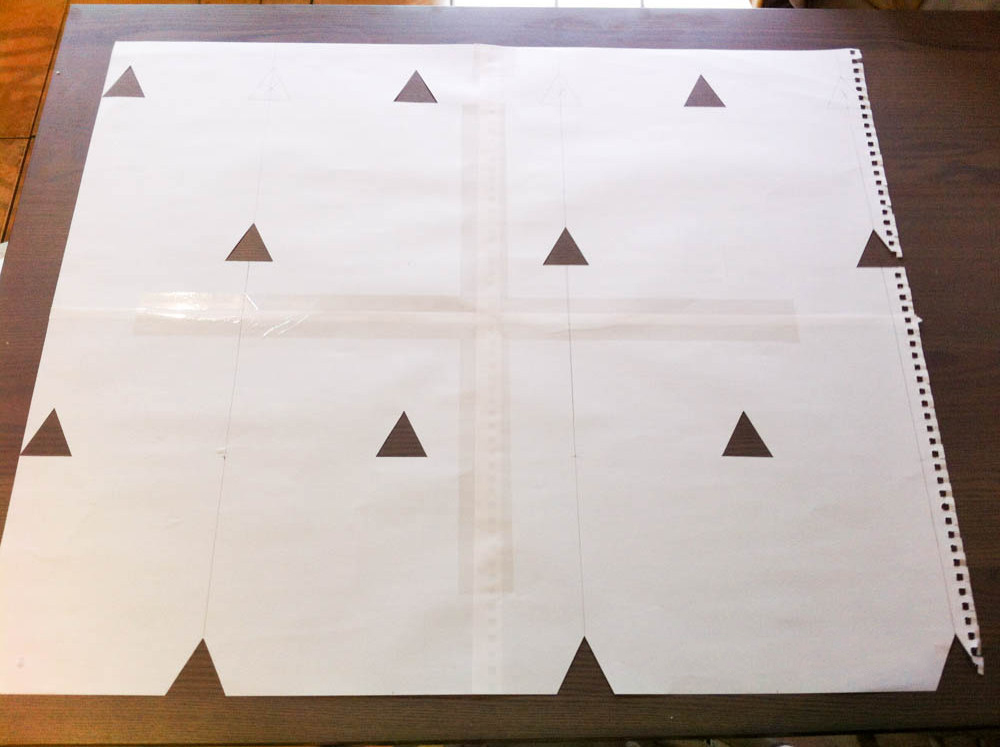
That didn’t work out well though, because the wee man would lie in bed at night and peel the decals off the walls, or turn the into different shapes. Sometimes idle little hands can’t help themselves, so I wanted to avoid the temptation this time around. Instead, I opted for four rows that ran down from the top of the walls, increasing the spacing the further down they went.

Tip: Use A Stencil
To get the spacing even, I made a stencil like I did for the gold dots in Eleanor’s old nursery here. It makes the process very straightforward, and saves so much time.
Simple DIY Wall Decals, Big Impact
The rows are evenly spaced on the stencil, but I improvised when I hung them, and shifted it down a couple of extra inches per row. I like them hung this way – they still add interest, but they’re not busy. And because the DIY wall decals stop a few feet above bed height, there has been no pulling them off.

Simple Ikea shelves and renter-friendly clamp lights are also up already. They’ve moved with us through three different homes – see them in our Chicago lofts here and here.
Shelves make use of otherwise dead space over the two single beds in the kids’ room, perfect for displaying little creations or collections. And books, for easy access at bedtime.
The curtains came with the house, and they’re staying. They’re a yellow gingham, not as graphic as the chevron ones on the mood board. The softer print still works, and they’re blackout lined, so I’m working with them.
Next Week
Now the DIY wall decals are checked off the list, next up is the beds. I’m upholstering two simple wooden frames – another simple DIY that can have a big impact.
MORE SPRING 2016 ONE ROOM CHALLENGE POSTS
Design & Floor Plan | Week One
Wall Decals & Shelves | Week Two
DIY Upholstered Beds | Week Three
Fixing & Organizing | Week Four
Space Saving Homework Station & Pegboard Toy Storage | Week 5
Kids Room Reveal | Week Six


Wow, what a great idea to make a stencil-I love how it turned out! It gives it such a modern, crisp look! I'm tackling a kid space for my ORC too (homework room), so I love finding the balance between kid friendly and mom friendly 🙂 Best of luck! Kristin @ Postbox Designs
Lizzie I adore the direction that your room is headed towards! You did SO much better than I did in my room this week.
I would love for you to share this post at Thoughts of Home on Thursday. I think our readers would really enjoy it!
Good luck in the upcoming week!
I love the triangles. It was definitely worth spending all the time cutting them smaller! It looks adorable! We are going to do polka dots in my daughter's nursery and I can't wait to see how they look!
What a fun plan! I love that you're being real about the fact that kids are kids and certain things don't work in a kids' room! (like my dream of grasscloth! Ha!) I love your writing style, too – this will be so fun to follow along!!! Cheers! -Stephanie from Ambience Inspired Interiors
Love the idea as I actually have one in my younger sons' bedroom. They too peal them off as I put some rows low but once I move the little one from his crib onto the big boy be and the older one in the top bunker, the triangles will be moved walls and I will put them higher. I actually bought mine for super cheap online but do love how you recreated yours completely. Initially I was thinking a full on wall paper but then said why not something easier like decals (and less permanent). 🙂